Upload forms, email and school or job portals usually limit the total size of what you send, not the size of each photo. That is the problem most guides skip: they show how to shrink one photo, or how to give every photo the same size, and leave you to guess whether the batch now fits. This guide covers both the free way and the way that hits a total.
Why zipping does not help
Putting photos in a .zip archive barely changes their size. JPEG and HEIC photos are already
compressed, so there is little left to squeeze. To make them smaller, the photos themselves
have to change: lower quality, fewer pixels, or both.
The free way: Preview
Preview, which comes with every Mac, can resize many photos at once.
- Select all the photos in Finder and open them together in Preview.
- In the sidebar, select every thumbnail (Command-A).
- Choose Tools, Adjust Size, and set a width or height, for example 2000 pixels on the long side. Keep Scale proportionally on.
- Save, or choose File, Export Selected Images to write copies in another format.
Two cautions. Adjust Size changes the files you opened, so work on copies if you want to keep the originals. And Preview gives every photo the same dimensions, not the same budget: a detailed photo stays larger than a simple one, so you still have to check the total and try again if it does not fit.
How much to shrink
| Use | Long side | Notes |
|---|---|---|
| Email, chat | 1600 to 2000 px | Looks sharp on any screen |
| Web forms, portals | 1200 to 2000 px | Check the form’s own limit |
| Printing | Keep the original | Shrinking loses print quality |
Lowering JPEG quality from maximum to around 80 percent usually cuts the file size a lot with little visible change. Lowering pixels saves more, but is easier to notice when someone zooms in.
The better way: a total size target
What you actually want is “make these 30 photos fit under 25 MB, and keep them as good as possible”. That is what Squish’s Fit the upload limit setting does.
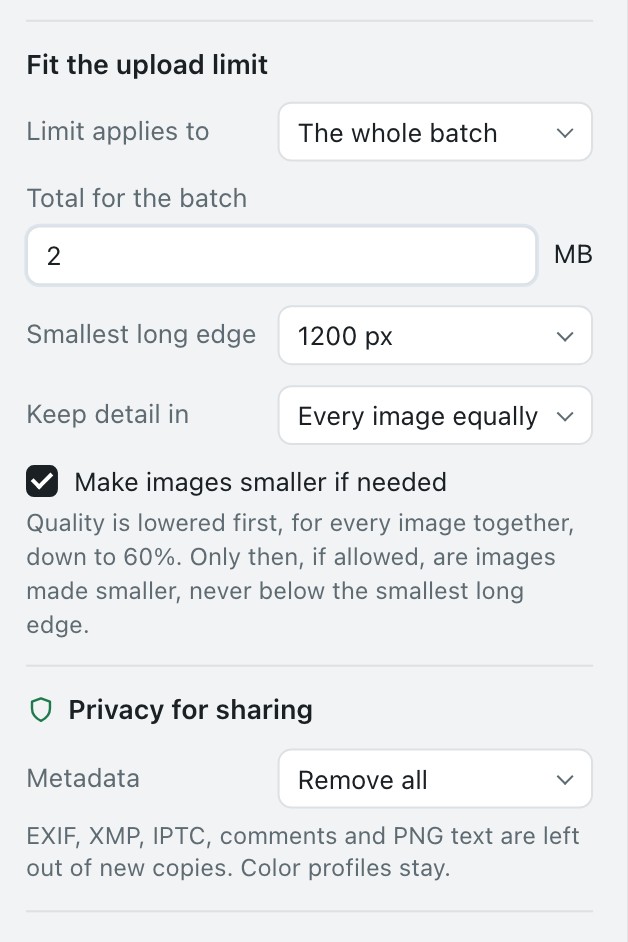
- Drop the photos into Squish. iPhone HEIC photos work on a Mac, as do JPEG, PNG, WebP and others.
- Under Fit the upload limit, set Limit applies to to The whole batch, and enter the Total for the batch, for example 25 MB.
- Choose the Smallest long edge you will accept, so no photo ends up tiny.
- Prepare. Squish lowers quality first, for every image together, and only then, if Make images smaller if needed is on, reduces dimensions, never below your smallest long edge. It shows every photo’s before and after size and the new total.
If the target cannot be reached without crossing your floors, Squish says so plainly and exports the closest result, rather than quietly producing photos you would not send.
Your originals are never changed. Squish always writes new files to the folder you choose, and can strip location data from the copies on the way out.
Online compressors
Websites that shrink photos work, but they need you to upload every photo to someone else’s server. For holiday snaps that may not matter. For photos of documents, children or your home, a tool that works on your Mac is the safer habit. Most online tools also set a target per file, not per batch.
Common limits to aim for
- Gmail attachments: 25 MB per email in total. Larger files are sent as Google Drive links.
- Apple Mail: larger attachments can go by Mail Drop, which stores them in iCloud for a limited time.
- Forms and portals vary, so read the limit on the form and aim a little under it.